
You’re close to harvesting and will now have to be very patient, as a good drying and curing process is probably the most critical step to produce high-quality dagga.
Flushing: Before you harvest
When to flush your plants is critical for a successful grow.
Flushing involves watering your plants down without adding nutrients for a duration of time before your harvest.
The purpose of this is to allow the plants a chance to use up all the nutrients that they have built up. This lessens the overall nutrient and contaminant load of the final product.
Flushing must be carefully timed with the production of trichomes. As flushing occurs just a week or two before harvest you must ensure that all resin glands are fully developed.
Depending on your growing medium proper flushing can take between a day or two or up to a week or more.
Flushing is recommended for all growers, whether hydro, coco coir or soil. Although, the time period for flushing will vary, depending on the medium.
- Soil: Begin flushing between one and two weeks before harvest.
- Coco: Flush your plants for up to one week prior to harvest.
- Hydro: Your plants only need to be flushed for one to two days.
Trimming: The first cut is the deepest
Before harvesting ensure that at least 30% of the trichomes are amber if you are mostly growing Sativa hybrids. Indica strains are more forgiving if you wait a little longer.

When resin trichomes are near their peak THC concentration they will have a translucent colour, while the plant is still producing resin in its trichome glands.
Cut at the tree at the base and trim excess leaves over a clean surface. Do not throw away your clippings, these can be used in baking or making hashish.
Every step forward you will need to be focused on reducing moisture by dehydrating the buds. It’s not too different from making Biltong in some ways.
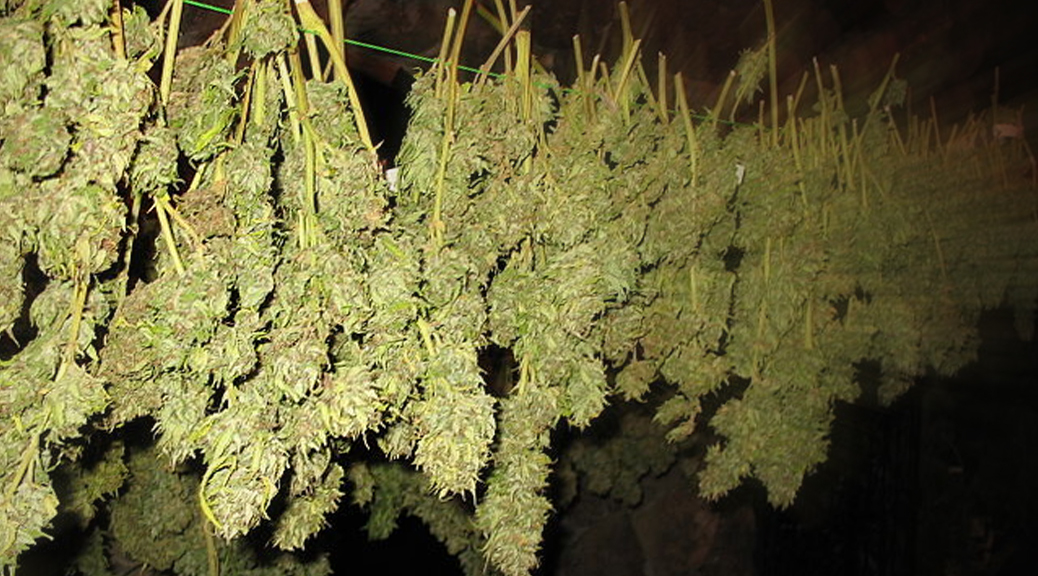
Hang the trimmed branches up to dry with enough space in between them.
Drying: The four pillars
During the drying process, the water content of the buds needs to be reduced from 75% to around 10 to 15%. Usually, this will take up to two weeks. It’s best to get rid of the biggest amount of moisture in the first few days. After these 3 days, the drying process should be slowed down a bit.
When drying dagga the properly it is critical to control the following four aspects:
Temperature: In the first three days the best temperature is around 20°C. This way the buds will dry quickly, but not too fast. After three days the temperature should be lowered to about 17-18°C to slow down the drying process.
Humidity: During the first three days the relative humidity should be around 50%. After that, the relative humidity should be kept at about 60% to slow down the drying process.
Air: It’s very important that there’s enough air circulation in the room, so it’s advisable to use an electric fan. A fan can also come in handy to control the temperature and humidity. Don’t point the fan directly on the buds though, this will dry the cannabis buds unevenly.
Darkness: The room should be as dark as possible. Light, especially direct sunlight, degrades THC.
When you can easily snap the stem the buds are dry enough to proceed to the final curing step. If it still bends, it needs some more time.
Don’t go too fast. During drying its not only the moisture but also chlorophyll and other pigments within plant tissue that will evaporate from the buds. If the buds are dried too quickly, some of these pigments don’t have enough time to evaporate and will end up in the final product. Dagga with high amounts of chlorophyll often tastes bitter or “green” and smells like wet grass.
Curing to perfection
When the buds are properly dried, it’s time to cure and store the finished product in an airtight glass jar. Even after a proper drying period of two weeks a little chlorophyll and other pigments will be left and will continue to break down.
The whole curing period takes between two weeks and two months, depending on how much patience you have and how you want your buds. There are dagga connoisseurs who only smoke dagga which was cured for at least one year.
Properly filled jar
The dagga has to be put loosely in a jar and it needs to be filled up to a maximum of two thirds since the buds need more air to breath. The jar needs to be placed in a cool and dark place. In the first two weeks, it’s very important to check the buds at least once a day to replace the air and check for growth of mould and mildew. After two weeks the jar only needs to be opened and checked once or twice weekly.
Curing good quality dagga is like ageing a cognac brandy. It needs time to develop an intensity of flavour that rich, smooth and has a lingering taste. Time is needed to achieve that complex and refined philosophical high.
Impress your friends and take your time drying and curing your dagga. It’s definitely worth it.
Help grow #DaggaMagazine
This post was first made available to Dagga Magazine’s Patrons. Become a Patron to help us make it possible to bring you the latest ganja tips and #daggafarian news.